Přejít k hlavnímu obsahu

Jak zkopírovat schůzku na jiný den v kalendáři aplikace Outlook?

Autor: Kelly Naposledy změněno: 2020-05-25

V kalendáři aplikace Outlook jsem se pokusil zkopírovat schůzku na jiný den zkopírováním a vložením. Byl však zkopírován pouze předmět schůzky, jak je uvedeno níže. Ale musím zkopírovat celou schůzku kromě jejího data zahájení / ukončení, nějaké nápady?


Zkopírujte schůzku na jiný den v kalendáři aplikace Outlook pomocí klávesy Ctrl

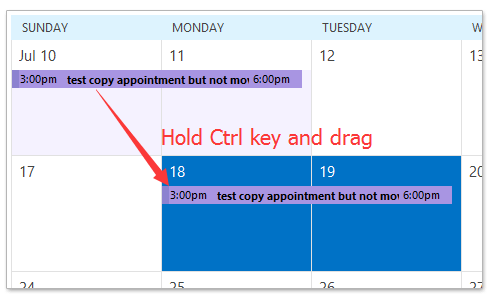
v Kalendář pohled na Outlook, vyberte schůzku, kterou budete kopírovat, přetáhněte ji na jiný den s podržením Ctrl a poté uvolněte myš.

A nyní je vybraná událost zkopírována přesně do jiného dne kromě data zahájení a data ukončení. Viz screenshot:


Zkopírujte schůzku do jiného dne v kalendáři Outlooku pravým tlačítkem myši

v Kalendář zobrazení aplikace Outlook, přetáhněte schůzku podržením pravého tlačítka myši, uvolněte myš, dokud nenastane zadaný den, do kterého ji zkopírujete, a poté vyberte Zkopírujte z rozbalovací kontextové nabídky. Viz screenshot:

A teď se událost zkopíruje do zadaného dne v kalendáři v aplikaci Outlook. Viz screenshot:

Automaticky přeposílat každý e-mail určenému příjemci v Outlooku

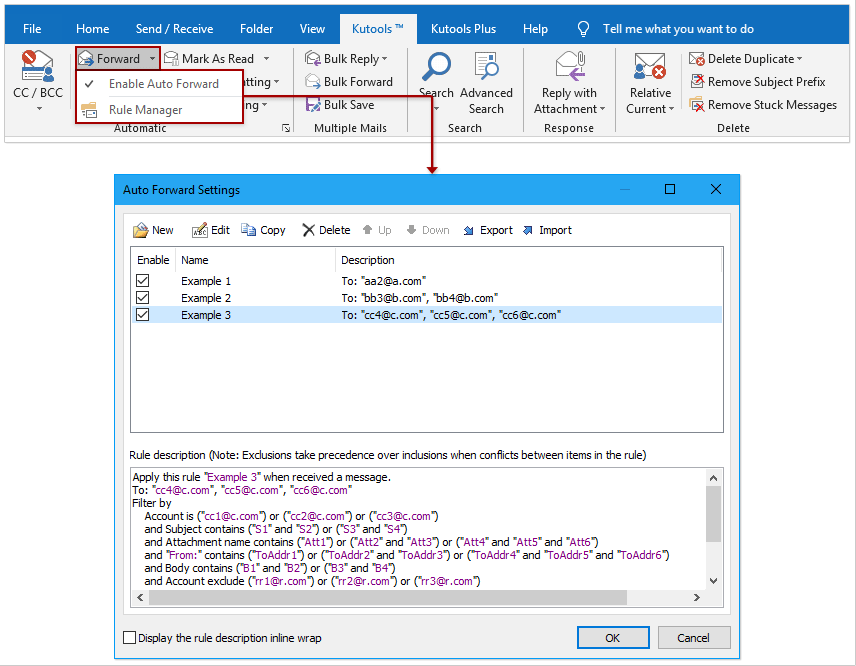
Obecně řečeno, můžeme nastavit pravidlo pro automatické přeposílání e-mailů určeným příjemcům, jako je váš jiný e-mailový účet, váš Gmail nebo vaši kolegové atd. Ale vše, co víme, bude trvat dlouho, než nakonfigurujeme vlastní pravidlo v Výhled. Nyní představujeme program Kutools pro aplikaci Outlook (Automatický) Vpřed funkce, která může nastavit pravidlo automatického předávání pouze několika kliknutími.


automatické přeposílání e-mailů

Související články


Nejlepší nástroje pro produktivitu v kanceláři

Kutools pro aplikaci Outlook - Více než 100 výkonných funkcí, které doplní váš Outlook

🤖 AI Mail Assistant: Okamžité profesionální e-maily s magií umělé inteligence – jedním kliknutím získáte geniální odpovědi, perfektní tón, vícejazyčné ovládání. Transformujte e-maily bez námahy! ...

???? Automatizace e-mailu: Mimo kancelář (k dispozici pro POP a IMAP)  /  Naplánujte odesílání e-mailů  /  Automatická kopie/skrytá kopie podle pravidel při odesílání e-mailu  /  Automatické přeposílání (pokročilá pravidla)   /  Automatické přidání pozdravu   /  Automaticky rozdělte e-maily pro více příjemců na jednotlivé zprávy ...

📨 Email management: Snadné vyvolání e-mailů  /  Blokujte podvodné e-maily podle předmětů a dalších  /  Odstranit duplicitní e-maily  /  pokročilé vyhledávání  /  Konsolidovat složky ...

📁 Přílohy ProDávkové uložení  /  Dávkové odpojení  /  Dávková komprese  /  Automaticky uložit   /  Automatické odpojení  /  Automatické komprimování ...

???? Rozhraní Magic: 😊 Více pěkných a skvělých emotikonů   /  Zvyšte produktivitu své aplikace Outlook pomocí zobrazení s kartami  /  Minimalizujte aplikaci Outlook namísto zavírání ...

???? Zázraky na jedno kliknutí: Odpovědět všem s příchozími přílohami  /   E-maily proti phishingu  /  🕘Zobrazit časové pásmo odesílatele ...

👩🏼‍🤝‍👩🏻 Kontakty a kalendář: Dávkové přidání kontaktů z vybraných e-mailů  /  Rozdělit skupinu kontaktů na jednotlivé skupiny  /  Odeberte připomenutí narozenin ...

Přes 100 Vlastnosti Očekávejte svůj průzkum! Kliknutím sem zobrazíte další informace.

Více       Stažení zdarma      Nákup


Comments (12)
Rated 5 out of 5 · 1 ratings
This comment was minimized by the moderator on the site
Muito obrigado! Funciona e é simples e rápido de fazer. A explicação com as imagens ajudou muito.
Rated 5 out of 5
This comment was minimized by the moderator on the site
I was able to follow Bethanne's comments and was successful after cursing MS on this for months. THANKS! "Find your folders pane. Mine is on the left of the screen and shows just two months over the list of folders. One can resize the folders pane to reveal more months. There's a border between the folders pane and the main calendar view. Hover over that border and your cursor arrow changes to the column resize icon. Now drag the border over to make the folders pane bigger and the main view smaller. More months will appear in the folders pane." Then, follow the suggestion to hold CTRL to copy while dragging the appointment you want to duplicate to the new callendar location, and DROP it.
This comment was minimized by the moderator on the site
On the left side of your screen should be a folder pane. Open and pin it to stay open, if it is not already. Click on the date of the appointment/meeting you want to copy. Then find the date in the control pane you want to copy the appointment/meeting to. Hold the ctrl button while clicking on the date(s) you want to copy to. All chosen date should appear on your screen. Then you can use the drag and drop with right click on the mouse, or hold ctrl while drag & dropping to the next date(s).
This comment was minimized by the moderator on the site
On my machine, any of the copy-paste methods (inc. ctrl+c, ctrl+v) do not copy the reminder - the one thing that definitely should be copied!
This comment was minimized by the moderator on the site
Thank you, thank you, thank you for posting this!
This comment was minimized by the moderator on the site
On a Macintosh computer, you hold down the Option key, then click and drag the item to a different day.
This comment was minimized by the moderator on the site
Copying the appointment by dragging doesn't work if the target date is not visible on the screen. The calendar does not scroll while you are dragging the appointment.
This comment was minimized by the moderator on the site
Hi,
Here is a workaround may help you.
Drag to copy the appointment to any one date close to the target appointment, and then modify the start date and end date of the new appointment.
Hope it helpful!
This comment was minimized by the moderator on the site
Agree, this is what I am trying to do as well. Anyone found a solution?
This comment was minimized by the moderator on the site
Did you find an answer for this, Guy? I need to know the very same thing.
This comment was minimized by the moderator on the site
Sandra's got the right answer, but I'll be more specific: Find your folders pane. Mine on the left of the screen and shows just two months over the list of folders. One can resize the folders pane to reveal more months. There's a border between the folders pane and the main calendar view. Hover over that border and your cursor arrow changes to the column resize icon. Now drag the border over to make the folders pane bigger and the main view smaller. More months will appear in the folders pane. It drove me absolutely crazy until I figured this out.
This comment was minimized by the moderator on the site
where you can view multiple months on the side or wherever you position them, you can view more than a year's worth if you click and drag the dragger* (sorry i don't know the correct term) you can then right-click your calendar invite, drag & drop it onto any day you choose
There are no comments posted here yet
Please leave your comments in English
Posting as Guest
×
Rate this post:
0   Characters
Suggested Locations